Showing posts with label woad. Show all posts

Wednesday, October 7, 2020

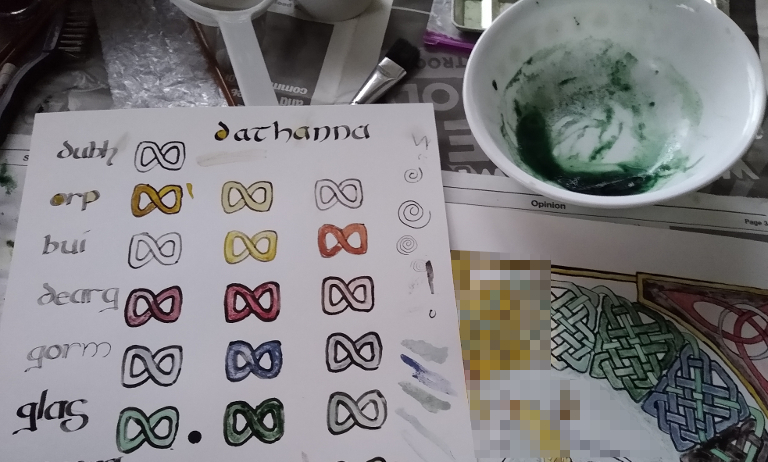
Book of Kells Project: Applying Green, Red and Blue

  Glas:


 Months ago I made iris green and, because unlike verdigris, it would go bad, I froze it to use later.  Now it was time to bring it out and let it thaw.

This turned out to be quicker than I thought.  I was worried it might be too thin, but as it thawed, I realized the freezing had done may work for me.  While some water remained frozen, I could pour off the green liquid that had a lovely concentration.  

And it was green now, not dark teal, and certainly not purple.  I had thought I might have to add a couple drops of water with soda ash to shift the color.  But I didn't.  It was green right out of the jar.  And it flowed great.  Not as smooth as the "gall" ink, but pleasant enough.   I applied it with a brush and it went rather quickly.

Iris lake was also used for a darker, forest green.   It would need to be mixed carefully like the other lake pigments.  


In retrospect, I regret not making verdigris.  My concerns about corrosion would have likely been mitigated by the thick paper being used.   Certainly in the short term it would have been safe.  Perhaps next time.

Dearg:


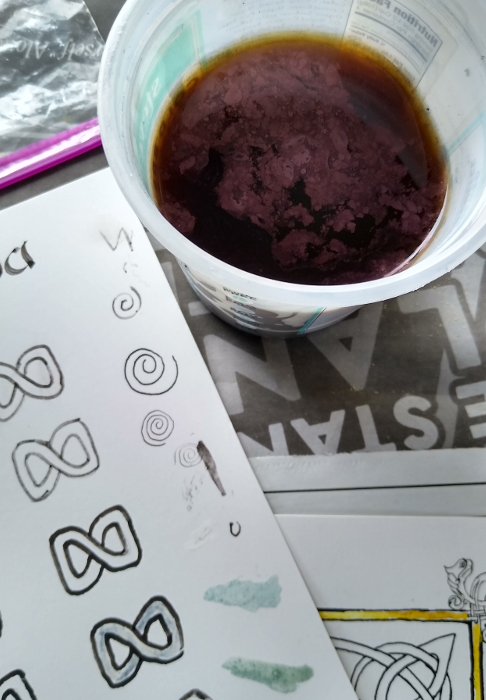
This was the moment madder was made for.  Having figured out how best to mix a smooth pigment, I almost ruined it by rushing the process.  The first madder I applied, the first lake of deep crimson, was grainy.  I just stopped, let the mix sit and did something else for a while.  When I came back, it was perfect. Then I ground and mixed the second lake of red and applied it. Things were coming along.


Gorm:

It couldn't last.   Woad blue was turning out to be my personal nemesis. Try as I might, I could not bring the bright blue of the dye or the deep royal blue of the extracted indigo into a pigment of equal vibrancy on paper.  After some reading, I heard about using indigo flower, the simmering "bloom" on the top of the indigo vat. As it happened, I was making small vats for another art project, so I just brought one in and used a brush to lift the bloom. 


It's not an efficient process.  I started to suspect that if I had mixed freshly extracted, still liquid indigo I would have had better results.  It did make a bluish wash, a tint really, and was better than the earlier blue gray disaster.   But it wasn't blue.   Then I remembered the columbine lake. 


This is what I used for the main patch of blue, painting over the indigo flower.  I left a border untouched so one could compare the effect.  

 In another belated reversal of opinion, I think I should have left the indigo flower.  It was subtle but more natural.  I suppose if the columbine lake completely fades, the indigo will come back into it's own.


Saturday, February 29, 2020

Making Lake Pigment

 I came across lakes while trying to find a way to make natural red pigment.   I'd already dyed with madder in the past, but simply powering the root doesn't work.  I wasn't even sure if madder would be the best choice.  Then I discovered Madder Lake.

It has no coverage, that is, it can't be used by itself to just cover up a color, but it is red, it is natural and it does work. 

Laking can be done with almost any plant  that has enough strong coloration to make pigment.   In the simplest terms, a "lake" is using a chemical reaction with alum and some base, lye, chalk or soda ash, to bind the colorants in a stable form.  Most lakes are made by soaking or boiling the plant material until a dark pigment saturated liquid is made.


Then one dilutes alum with a small amount of water and adds it to the pigment.  Often, though not always,  there is a color shift, usually to a richer more saturated hue.  But sometimes the liquid is just too dark to tell.  To this alum mixture is then added a diluted base.  Sometimes, like with chalk, there is a vigorous reaction. But usually there is just an interesting, but not messy, swirling of the contents as the alum and base bind together.   

Proportions are important: too much of one or the other and the color is weak or pastel.  Or their is a lot of whitish debris that increases washing time.  Generally more alum is used than the base, but exact proportions vary on the kind of base.

Once the reaction is complete, the liquid will be filled with a colloidal solid.  This will take a while to settle, often hours, if not a couple fo days depending on the pigments involved.  After it settles, it's washed, that is the liquid is poured off consecutively until the water is clear and the settled solid can be strained and dried.   One can also save the first pour off to make another, paler, lake.   

This opens up a wealth of natural pigment possibilities.   But their are caveats.  Many plant based pigments are not colorfast.  There are exceptions: madder, weld, woad. Really anything that has a reputation as a colorfast dye will probably make a colorfast lake.  The color will be different: madder is pleasantly true red but woad becomes a dark teal.   The advantages of lakes, once they are dry, is they can be stored indefinitely, though one probably should keep them out of direct light.  When one was ready, they were ground and mixed with water and gum arabic to make a water color, or ground into oil for oil paint.


So this was exciting.  I could, in theory make pigment out of anything.  But I discovered this is February, when few plants are available.   Then I remembered the dye baths I'd saved.

There was a lot of mullein  and a medium jar of madder.  They were stored in a cold place in the garage and hadn't fallen prey to mold.  So I experimented.  It turned out to be the best thing, experiment with old dye baths.   Mistakes could be made that would have made me very sad with fresh, high quality madder roots.  Like when it when pink, for instance:


According to these forums pink madder is the worst.  I'm not a fan of pink, so I tend to agree.  The whole point of madder is making red.  But pink is a useful pigment  to have on hand, so lemons, lemonade, etc.

My drive was an inspiration for a Book of Kells project where I'd use just natural pigments.  Learning to lake pigments made that idea possible.


Sunday, February 23, 2020

Book of Kells Project: Woad pigment

 Woad pigment was used in the Book of Kells.  I wasn't too surprised.  Woad was used for blue dye since, well, prehistory probably.  It is said Celts tattooed themselves blue or painted themselves blue with woad.  But this is now being called into question for many reasons.  However, anyone who has used a woad vat would notice a blue scum does collect at the top and it seems perfectly plausible this could be used as a simple pigment.

Extracting indigo pigment from woad turns out to be much simpler than dying with a woad vat.  With a healthy plants, good soil and the right equipment, you can process and wash indigo pigment in a handful of hours. 

First the fresh first year leaves(*) are picked and thrown into boiling water. As soon as they are all in, I turned the heat off.  There is a fine balance between hot enough to extract but too hot and damaging indigo precursors.  I took it off the heat, put a tight lid on, and moved the pot to cool on bricks outside of the house.  


Once it's cool enough to handle(a couple hours or more), I squeezed the faded spent leaves, and strained the liquid.  It should be a lovely warm russet reddish brown.  This is full of indigo precursors.  Now some people use beaters or pour the liquid back and forth between containers, or a blender.  Personally, I have things to do so I go strait for the Vitamix. 

Pour the whole thing in, add a teaspoon or more of soda ash, and mix.

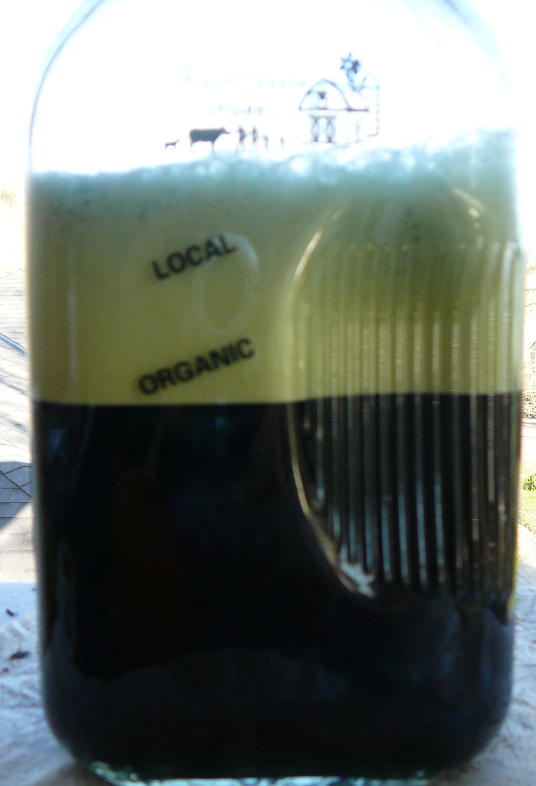
Use the lowest speed for a couple of seconds, until everything is mixing around, then take it up a quarter until you have a nice vroom and everything is getting frothy.  Don't go too high or too long, or the indigo will all land on the top of the foam and take forever to settle.  When you see spots of blue on the top of the foam...no more that 15 to 20 seconds...you're done.


You will be able to see the indigo falling to the bottom, in the dark greenish blue liquid as "swirlings", but it'll be too dark to see the pure blue until it's washed.

Let it sit for half and hour to and hour, however long it takes for the liquid to settle and most of the foam to disappear.  

Now you have to be careful.  The liquid is too dark to clearly see the indigo sitting at the bottom, though you may see some if you shine and very bright torch right up against the glass.   Because you can't see it, you have to CAREFULLY and SLOWLY pour half the liquid out(you can save this to lake  if you want to).   If you fumble, you have to put it down and let it settle again.  The indigo is so fine, once disturbed it is float freely, happy to escape down the drain!   Once you get practiced you have a good idea how far you can go.


Now add clean cold water to the jar filling it up, and let it settle again.  At this point you can barely see the slightly darker mass at the very bottom.  Usually no more than a quarter inch unless you have very healthy plants.  Repeat the process.


Now the liquid is a medium transparent green and the indigo is clearly visible.  Depending on technical skill and fine motor control, you can cut down your washing time significantly once you have an idea of how fast you can pour without losing indigo or cause backwash.  Once the water in the large container is a very pale green tint, you can transfer the indigo to a smaller container to wash.


You want to wash it until the water is clear and the indigo is a deep dark blue.  It will be the bluest natural blue you have ever seen, like a deep lake under a clear sky.   

Once the water is clear, then it needs to be poured and siphoned off.  Turkey basters and pipettes help.  When the indigo is in a small container with only an eighth inch of water, then it can be poured onto a glass plate or other non reactive flat surface to dry.  


Indigo is supposed to produce, once ground with binders and water a dark navy blue, not as spectacular as the deep blue dye. But at least it's blue.


*Most sources insist one use first year leaves.  But my plants are deciding they are perennials...after flowering, they put out new leaves from the roots and they are the same quality as "first year leaves". They should be soft, slightly hairy, green with the purplish stalk.   I don't know why my plants are deciding to be immortals, but I'm not arguing as long as they keep the blue coming. 

Tuesday, April 2, 2019

The Great Woad Experiment: from 2006-2016


The Great Woad Experiment: from 2006-2016

I’ve been growing woad for years.  My first wee plant I started from seed, outside and I still marvel it came up with so little  fuss. One day a couple weeks later, there it was , a small rosette of leaves.

These plants are decedents of many years, for while I have grown and harvested woad, I had yet to succeed in making dye.

[plant pic]

I am a bit of a romantic purist.  Many other worthy woad-ers have developed new methods.  One includes beating air into the water…?

That’s lovely and good luck to you if that’s what  you’re looking for.   Here, we will be exploring the fermented vat dying used in the middle ages.  The Ye Olde Stinky Method.

My attraction is connecting to the past crafters by doing my best to understand the craft by doing it the way it was done, or at least as close as I can with the materials on hand.  And so I am committed to the fermented brew method.

Warning: this stinks.  Quite a bit.   The process breaks down the plant fibers mechanically, and chemically, releasing the indigo on the molecular level.   It took reading and rereading old texts and several scientific studies to make a roadmap of the best way forward:


Step 1:   Harvest first year leaves and mash into pulp.


Traditionally this was done with a woad mill, a horse drawn wooden wheel that would crush leaves.  Workers would then gather them, perhaps knead and crush them more by hand.   One should be cautious of taking the short cut of using a food processor to blend the leaves or chopping them with a knife.  There is a theory that some of the bacteria necessary to start the fermenting process is on the surface of the leaves and NEEDS to be crushed and smooshed into the wet leaf mix.

Note, first year leaves have the most indigo, but I have found second year leave to have some.  Not a lot, but enough I find it worth throwing in the vat if I’ve nothing else.  The dye will be weaker.

Step 2:  Make balls out of the mashed pulp


Ideally you have enough to make balls the size of a fist, but, until recently I rarely had enough to make balls more than a couple inches across.    Put these on wooden racks or shelves covered with news paper, in a shaded warm, but ideally not hot, place, with plenty of air circulation to dry.   I use a garage or shed.  Try not to dry too fast; you want ball to start to rot/ferment inside.  It will shrink slightly during this process.  When its completely dry, it’ll be a hard dark ball.

At this point you can store it indefinitely.   I spent a couple years after the first failed woad vat doing this, making balls and storing them.

Step 3:   Crush the balls with a hammer and soak them in ammonia for a couple weeks


Traditionally this is call “couching”.   Also, traditionally, one uses, ahem, “home made” ammonia, that is urine from privies set aside to ripen for a week expressly for purposes like this.  In the Middle Ages urine was necessary for all sorts of chemical uses.  I’ll leave it to the individual to pick their ammonia source.  The leaves should be thoroughly soaked, no standing liquid; I put mine in a plastic container and seal it with a lid.  If you leave it longer that 2 weeks, that’s fine.  I once left mine for 2 months and it was okay.  2 weeks seems to be a minimum.

Step 4:   Mix the couched woad with hot tap water and soda ash


This is where things get tricky.  I make very small batches so I think in terms of handfuls and pinches.  Other people are doing things in tubs, so they think in pints and gallons.  The good news is this is not an exact science and there is a bit of an art.  And to some degree you can correct.  Keep notes.    I’ll describe what I did, give rough gestimates on measurements and let the reader take from that what they will:

My first successful woad batch had perhaps 2/3 to half cup of dry crushed woad couched in a cup or so of “traditional” ammonia.  To that I added 1 tablespoon of soda ash and enough hot water to make it a pint.  This mixture was stirred thoroughly, then poured into a gallon bucket , where I added a little more water , perhaps up to a half gallon, then closed it with a lid, and set it in a warm room for a couple of weeks.

It is also possible to brew it on a stove for a quicker batch but

a: it stinks
b. you run the risk of cooking the bacteria that is working in the vat
c: it stinks

It does, however, need to be warm.  Traditionally woad dying was done in July and August, in the heat of the summer.   I can cheat a bit because, as a ceramic artist, I can always put the vat in the kiln room any time of year.  Heat is definitely necessary for the finally success. But for now just let the wee bacteria ferment and brew at their own pace.

Step 5:   Test the vat PH

In a couple weeks you will notice an iridescent, bluish scum form on the top of the water.   It’ll start out as a colorless oily sheen, but then slowly take on a bluish hue, if you have enough indigo.   The vast, if not ready, is definitely getting there.  Indigo ions are floating free and the water will either be yellow or green.   Using ph strips dip one in.    You want a ph of at least 10.  Off the chart is fine.   My batches are 11+.     If it is lower than that, add a little soda ash, a tablespoon at a time.  Mix, test again.  Once you’re ph is set, you can go to the next step immediately or wait a couple days until it convenient for you.

Step 6:  Dying preparation


I advise experimenting with animal fibers.  They’re the most vibrant.  But any natural fiber will work.   Woad doesn’t need a mordant, but it does need for you fabric/fiber to be thoroughly soaked.   Try not to overwhelm your vat like I did and limit fiber amount to give or take 4 oz per gallon.

 Soak your fiber/yarn/cloth in a bowl of warm water for at least an hour to overnight.  

Step 7: Dying


Heat the vat up to no more than blood heat(90 to 98 degrees).  By touch this means when you put your finger in the water you can barely feel it because it’s the same temperature.  I actually like mine slightly warmer, but no more.  You can heat on the stove (carefully), or put the vast in a hot room(kiln room?  Furnace room?), by a fire if that’s convenient.    Use a wooden, plastic or stainless steel spoon or implement to GENTLY stir the vat.  You want it to be thoroughly mixed but to add as little oxygen to the water as possible.  I do one last ph test at this point.  If it’s go, then gently squeeze—don’t wring!-- most of the water out of the fiber to be dyed, then GENTLY slide it into the vat until it is completely covered.  Using a spoon or your fingers, push the fabric down and manipulate is as you need to to make sure its evenly sitting in the vat, without clumps or folds.  Then cover the vat with te lid and leave it for at least 15 minutes, but I recommend a half hour.


NOTE: I often have a test dye of a short piece of yarn, maybe 6 in,  if I’m doing something large.  Just soak it in water from the tap, dip it in for 10 to 15 minutes, then take it out.  Then you KNOW all is working well.


Step 8:  Remove the fiber and air


You might want to take the vat outside, into a garage, or on a back porch for this.  It is likely to get messy and stinky.  When the fiber comes out, it will be covered to some degree  with woad compost that will have to be scraped or rinsed off.  You also want to have someplace to hang your stinky, drippy experiment.   Ready?


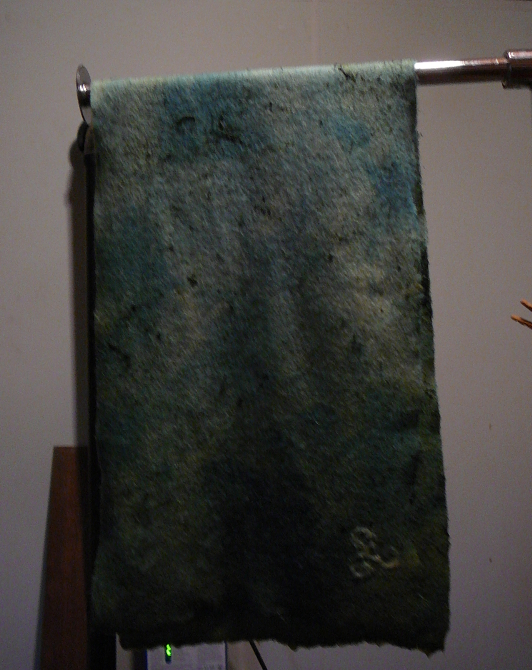
Open the lid and fish the fiber out, gently squeezing out the water, preferably back into the vat.  Yes, this can be rescued, up to a point, and even without indigo, the vat has the cultures to make future vats.  Depending on how large your vat was and the quality of woad, the fiber might be anywhere from yellow to green, with a scattering of woad compost.   As it hangs exposed to air, it will very slowly start to change color, from yellow green, to blue green  to blue.    Unless you have a mad ratio of woad to fiber, the blue is likely to be med- light to pale-blue.  It is possible to get a nearly navy blue on the first dip, but I’ve only seen that in a docu with a massive old vat and a tiny bit of sheep fleece.  Usually fiber has to be dipped  2 or 3 times for that nice royal blue.
(Note: I failed to properly soak this fiber long enough, making a blotched dye pattern.  Wish I could say  "I meant to do that"...)


Let your fiber air until it’s completely changed, then rinse in out with cool water.  


The Magic:  what the heck is going on?

As I understand it:   The fermented woad vat involved several chemical and biological processes that result in a low ph environment that forces indigo molecules to float free and lose their blueyness.   In this state they permeate fabric.  But when they’re exposed again to air, the molecule rebinds with oxygen, trapping it mechanically in the fibers and returning to it’s blue color.    The blue of woad is permanent.  Only bleaching will destroy it.  

This was my very very first success.   I remember jumping around yelling, “Eureka!”

I had failed yet again, decided to add a little more soda ash, test it with the yarn, and nothing.  Still.  Sigh.  Then out of the corner of my eye I thought the yarn looked a bit odd.  It was undyed wool, and covered with a scum of green woad compost, but it seemed darker…. A closer look showed it had in  fact turned blue!  Well, teal, because the undyed yarn was an oatmeal beige.

It was quite exciting stuff.

Thank you for reading, especially the people who dye with indigo plants  who must have found this to be  the funniest thing ever.

GMRA