Tá mé an-mhall an bliain seo....
 |
| pioc cárta ... aon chárta |
Christmas cards finally sent...better late than never!

Adventures in foraging, wild~crafting, historical and invented food... ...with a bit of bad Irish
Tá mé an-mhall an bliain seo....
|
| pioc cárta ... aon chárta |
Christmas cards finally sent...better late than never!
At long last, it's done.
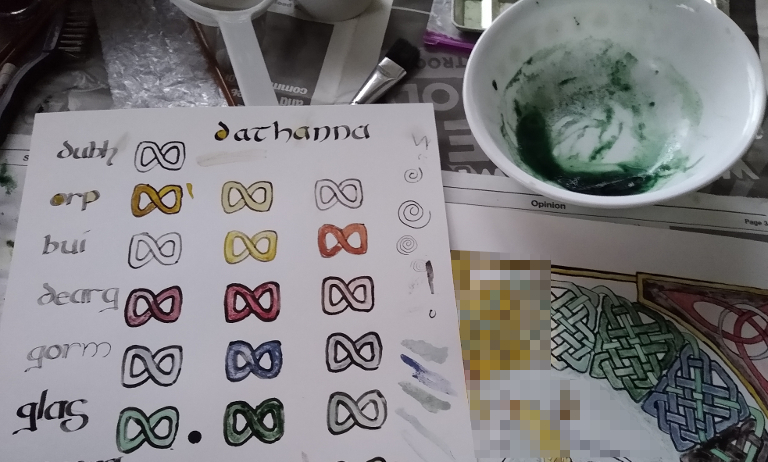
But I cannot publish the finished art because of the rules of the contest. I can publish the low resolution color test sheet, with all its mistakes and scribbles:

What I learned: those monks are metal. Even limiting myself to natural materials and the morning light, I still had the advantage of central heating and food security. And modern conveniences. If poor Brother Cadfael wanted a hot cup of coffee, he had to wait for the Renaissance. Tea wasn't much better. Whatever hot drink...herbal tea, beer, wine...it would have been a hassle to heat it up. There was no microwave in the scriptorum!
While I succeeded in creating colors from all natural sources ( to which some pedant will say: "Actually, petroleum is a natural source". Dun do bheal!), I completely failed at even coming close to a majority of the original pigments. Historical pigments used:
Gall Ink
Indigo
And that's it.
Now if I was to expand that to pigments documented to be used in the Middle Ages, we can add:
Iris Green
Zinc
Any lake puts us in the Renaissance. Sticking to known medieval practices, the best I could say is 4. But all natural sourced... that is, what a monk or medieval artist could make with the materials and technology of the time.
Here's the color sheet with source pigments labeled:

As for the contest, feicfimid.
.
After all the main elements were finished, some details required creatively mixing color.
Orange/Oráiste
This color is conceptually a modern invention. It isn't that the ancient Irish didn't see orange. Linguistically they just considered it a type of dark yellow. There's some very interesting documentation about how different languages develop words for colors depending on their lifestyles, the cultural importance of the color and it frequency or rarity.
Even in English the word for "orange" is the same as the non-native fruit, implying in the original Anglo-Saxon we also thought of "orange" as a kind of yellow or gold. The point being I needed ORANGE for a design element. And so I did it the typical way and mixed red and yellow, or rather, some madder lake and tansy lake.

It was a reasonable result, pretty if not authentic.

Around this time I also mixed up the mullien lake, made without chalk. I wanted a less opaque yellow for some details.

Pink/Bándearg:
I actually had some pink madder lake I could have ground up. But the zinc and madder lake were still available and I was tired out with grinding. So I made a mix with a little water to wash and detail a background.
Grape Hyacinth and Bluebells inks:
I did not freeze these like I did with the Iris Green. That was a mistake. I did add alcohol, thinking that would be enough to preserve them. While they did not mold, or otherwise physically degrade, their colors suffered. The grape hyacinth was no longer purple or even lavender, but a weak yellowish green. Ditto for the Bluebell Ink, that also lost it's magical two tone quality.
Nonetheless, these are colors useful to tint backgrounds. See, as the art was finishing, I was noticing how very BRIGHT the background was compared to the art in the Book of Kells. This is down to using vellum and the age of the vellum. Considering the quality of the lighting at the time, the monks would probably have preferred a bright white background if they could get it. But stylistically, it was too much so I was looking for something to dim it, just slightly. These inks served well.
There was also mixing and blending for small details, like madder lake and zinc to make a silvery white for the moon.
"Crottle:
This lichen ink was also a useful background wash, mainly for the snakes. Of all the washes it came the closest to imitating old vellum. Maybe I should have used it from the beginning.
It's a very bad pun.
"Donn" is Irish for brown and sounds like "down" in some dialects.
Yep. Ní duine greannmhar mé. Moving along...
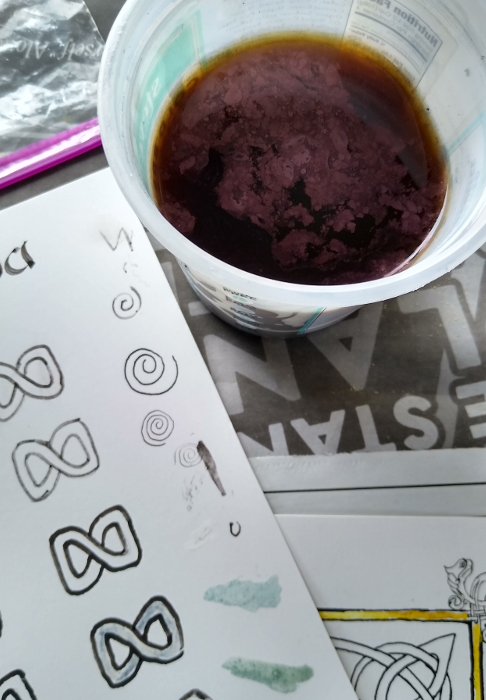
Chestnuts are a staple I forage for in the fall. I use them in stews, cakes and stuffing. When boiling them during processing, the liquid was always dark brown. Surely this could be used for ink or something, right?
Well, yes. Any nut with tannin can be processed with iron salts to produce ink. Chestnut is less dramatic than oak galls or acorns, but it does work. The color isn't black, but a warm dark brown. Which is useful when you need brown.

Chestnut ink was a nice accent. It also served as a substitution for the lack of any purple from the orchil disaster. Really would have liked that...
As an aside, dark brown in the manuscript is attributed to iron gall ink. But I wonder if this just isn't age or a reaction with the vellum substrate? Because my oak tannin based ink is BLACK. But I could imagine it might shift tone with age.
Glas:

Months ago I made iris green and, because unlike verdigris, it would go bad, I froze it to use later. Now it was time to bring it out and let it thaw.
This turned out to be quicker than I thought. I was worried it might be too thin, but as it thawed, I realized the freezing had done may work for me. While some water remained frozen, I could pour off the green liquid that had a lovely concentration.
And it was green now, not dark teal, and certainly not purple. I had thought I might have to add a couple drops of water with soda ash to shift the color. But I didn't. It was green right out of the jar. And it flowed great. Not as smooth as the "gall" ink, but pleasant enough. I applied it with a brush and it went rather quickly.
Iris lake was also used for a darker, forest green. It would need to be mixed carefully like the other lake pigments.
In retrospect, I regret not making verdigris. My concerns about corrosion would have likely been mitigated by the thick paper being used. Certainly in the short term it would have been safe. Perhaps next time.
Dearg:


This was the moment madder was made for. Having figured out how best to mix a smooth pigment, I almost ruined it by rushing the process. The first madder I applied, the first lake of deep crimson, was grainy. I just stopped, let the mix sit and did something else for a while. When I came back, it was perfect. Then I ground and mixed the second lake of red and applied it. Things were coming along.

Gorm:
It couldn't last. Woad blue was turning out to be my personal nemesis. Try as I might, I could not bring the bright blue of the dye or the deep royal blue of the extracted indigo into a pigment of equal vibrancy on paper. After some reading, I heard about using indigo flower, the simmering "bloom" on the top of the indigo vat. As it happened, I was making small vats for another art project, so I just brought one in and used a brush to lift the bloom.

It's not an efficient process. I started to suspect that if I had mixed freshly extracted, still liquid indigo I would have had better results. It did make a bluish wash, a tint really, and was better than the earlier blue gray disaster. But it wasn't blue. Then I remembered the columbine lake.

This is what I used for the main patch of blue, painting over the indigo flower. I left a border untouched so one could compare the effect.
In another belated reversal of opinion, I think I should have left the indigo flower. It was subtle but more natural. I suppose if the columbine lake completely fades, the indigo will come back into it's own.
Earlier in the year, when I'd first extracted indigo pigment and made the first lakes, I was so excited. All I had to do was grind them, mix them with gum and water, and I would have homemade paints. Yay! Bhí an-sceitimíní orm...
About that...
The experiment with indigo was less than satisfying but instructive.
Firstly, indigo doesn't grind down and mix into the lovely blue that one expects from dying. At best, it makes a navy blue grey.
Secondly, it was grainy. I thought I wasn't able to grind it finely enough, even though I bought a chemist mortar and pestal for this purpose. That was part of the problem. But I was to find out the method that worked for me was to grind it as fine as possible, WITH gum arabic, then mix a little water and alcohol, grind it some more, then let it sit for 15 minutes to a half an hour. THEN grind mix it once more to ensure consistency, adding a little water if needed.
This is not the method used for traditional oil paints. The pigments used in the Book of Kells are all in the category of water colors: a finely ground pigment, with a binder and water. It's simple, but requires some practice.

Taking the lead from unfinished pages in the manuscript, after inking, I applied the false orpiment. Both the laked tansy and laked mullein produced workable paint with minimum of fuss. After testing them both, I decided tansy made a better orpiment substitute. Regretfully, I was never able to grow enough weld in time to experiment with laking it. Perhaps next year.
Next, I made some washes with the pale blue lakes, woad and columbine, as a back ground to the center piece. These were much less satisfying, being grainy and uneven. This was where I started to let them "soak" a bit. Fortunately they are pale and give a rough textured effect which, while unwanted, is artistic in it's way.
The zinc white was extremely easily to work with. It also doubled as a sort of "white out" if used in very small doses, to cover minor smudges. It neither has the coverage of real whiteout, nor do any of the pigments have 100% coverage, so one really must plan to be as careful as a monk in a scriptorium with nothing else to do.
With the center and "gold" highlights done, I was ready to fill in the rest of the colors.


I thought this would take forever. But it turned out to be the most successful, glorious, satisfying part of the project.
Firstly, the ink came out a lovely black. Many sources and people I discussed this with were dubious acorns could be a substitute for galls. Their position, not unreasonable, was the tannins just weren't as concentrated to work. My position was that just meant I had to boil them down more. That is the entire reason galls were preferred, their tannins are more concentrated naturally, correct?
Secondly, in addition to the lovely color, the ink flowed so smoothly you'd think it was manufactured. I credit this to double straining through muslin before mixing the iron salts with the tannin liquid.
Thirdly, in my second batch, I hit the perfect proportions of iron salts to tannin. If it's too far one way, it's grainy; too far the other, it's more of a dark charcoal wash and needs more time to evaporate to the right consistency. But if it's perfect, just touching the liquid will leave a dark black stain on the skin that will take a day to wash off completely. That is ink!
Fourthly, it could handle as much detail as the quill nubs allowed. This was such a relief for the tiny twined lion heads at the corners. And a single dip really did go far. If I was writing at a normal size, I could easily scribe lines long enough to finish a couple sentences at a time without pause.
All was not roses however. There were some missteps. For some reason I misremembered the styles used in the Book and I "corrected" some of my thin lines, making them much thicker than I needed or wanted. Fortunately, I only did that with one element and it looks as if I "meant to do that".
And I narrowly avoided disaster by unwisely shaking a nub, causing a large drop of ink to fall. Fortunately this was done on the color test sheet.
Another annoying issue was my fumbling straight edges. Those monks must have been kung-fu masters with straight edges. After the second smear, I just had to stop before I made it worse and accept my "straight" lines would have a wavy appearance.
It took me less than a week to ink the traced design, which was surprising. But gall/acorn ink flows nicely. It's even friendly to my extremely rusty calligraphy skills. All in all a joy to work with. I may never buy ink again!
Below is the color test sheet. On it all pigments and inks will be tested before application. On the right side one can see the spirals tests of various pen nubs.

A final note: all inking and painting was done during the morning, with natural light.
Aug 21st: I finally settled on and finished my design which I drew on the computer. Unfortunately, I cannot publish it in any recognizable form before the contest because the rules strictly only accept unpublished art. So the most of the design seen will be edges and close ups that doesn't reveal the whole.
The design changed over the months, from May to August. When I started I swore the theme was the "animals" from the Book of Kells. And I was prepared with not only my center beast, but peacocks and snakes and lions. However, at some point I checked the website again and they'd had a complete redesign and changed the theme to the colors.
Frankly that suited me fine, since I was one this journey to try to recreate colors with natural sources. And it made me feel better when, after the second design change, I abandoned the peacocks. This was sad, because, individually, I really liked them. However, they didn't fit in the new design. I might use them in another art project.

By August 21st, I finally printed out the design to trace and I felt I was cutting it fine. I wanted to be finished inking by September and I still had no idea how many complications pigments would make for illumination on the way. I certainly didn't want to turn into a crazed artist working day and night through the month of October...
Aug 22:

I started tracing the color test sheet over a light box powerful enough to shine through 130# paper. This would serve a dual purpose of testing applications and archiving pigments. I wanted to use charcoal, but reluctantly had to admit a mechanical pencil was my best bet to retain detail.
Then I hit the first snag: the heavy weight water color paper I'd chosen had a terrible tooth. I worried that the calligraphy quills would scrape and the ink would bleed. And any detail would be completely out of the question. At this point I had no idea how the materials would behave. But the only ink friendly paper I had was far too thin. Amazon to the rescue! I ordered heavy ink paper with a smoothness similar to vellum, and crossed my fingers....
Sept 22:
Strathmore pulls through and I finally start tracing. I redo the color sheet and start on the main project. The results are smooth and detail will not be a problem. Assuming there's no bleeding.

Initial tracing finished before the end of September. Faoi dheireadh!
I was so excited when I learn about orchil or orcein lichens that produced a pale purple or lavender ink as a pigment in the Book of Kells. How cool is that?
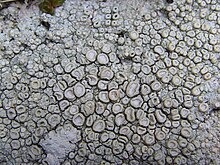
A bit of research indicated what I should be looking for was a local species of Ochrolechia, which when processed with ammonia, would develop a purple dye. However this lichen loves to live on rocks at the coast and being somewhat inland there was no readily accessible supply in any quantity.(NEVER collect lichens unless there is an abundance and they have fallen from their substrate.) Around this time Covid lock-down was in full swing and any visits to the coast were put on hold. I thought there would be plenty of time to revisit this and so looked for alternatives that might work.

Oak moss or stag lichen can also be developed with ammonia to produce, if not purple, then a pinkish lavender wash. Unfortunately, even after three tries, while I was able to get a color shift, I was never able to get it to budge out of muddy maroon into purple. Even trying to shift the pH on the advice of some excellent books, did not help. Dye tests produced a sad medium beige and no matter how concentrated the maroon liquid got, it did not make an interesting or distinct ink color. Which is a pity because we have masses and masses of oak moss that fall to the ground after wind storms if you know where to look.

Experiments with other local lichen were much better: usnea makes a brassy yellow, but only as a dye, not as an ink. And then there's crottle...

Technically crottle is parmelia saxatilis . I used a similar local species Parmelia sulcata. This lichen is reliable. No wonder it was used to dye tweed for centuries. The color starts developing in hours, and really, doesn't need ammonia, but I did it anyway. The dye is dark and produces a nice warm reddish brown. The ink is much weaker, but actually nice for shading. A medium ash beige. So, not traditional, but natural based and useful.
Alas, for the purple that never was. Maybe I can make a trip to the coast over the winter and collect some experimental samples. Failure to make lichen purple ink was the most disappointing aspect of the project.

 |
| yarn dyed yellow with Mullien and Usnea, with "crottle" brown yarn |


What to do? I restricted this project to natural pigments, maybe not exactly the ones monks used, but things they could have used. And I don't want to cheat. I feel paper is a reasonable cheat, calves skins being hard to come by.
So read up on all the well known yellow pigments of the old masters.
Indian Yellow seemed nice. Ah, but it involved mango leaves and animal abuse. Really. It's pretty awful if this is accurate. There is a modern substitute which would do in a pinch, but I was unenthusiastic.
There are some bright ocher yellows, but lets not kid ourselves. Colored soil is not going to approach the vibrancy of orpiment. I'd rather use yellow.
That brings us to plants dyes, specifically laking plant dyes. I'll have a laking post soon(link). There were a couple of good subjects by color. Saffron was too expensive...any saffron I'm going to cook with!...but there was turmeric.
Turmeric makes a bright yellow, and there was plenty about because I use it for egg dying in the spring. So I laked it, just so I had something if nothing better came along.
Problem is turmeric is fugitive...it is not colorfast and fades rather noticeably after a year, in even indirect light. Next up: mullein.
Mullein makes a nice pastel yellow dye on cloth. So I wasn't to eager to waste my time laking it. The other problem with lakes is they are semi transparent, that is they have no coverage power. I was already figuring I'd use zinc as an undercoat. Then I read somewhere weld...the go to yellow dye of the middle ages...when laked and precipitated on chalk, could be as brilliant as orpiment.
That's when I decided, okay, okay, I'll buy weld seeds! Up until then I thought weld was over rated. Yellow dye plants are really easy to find. But weld is the most colorfast natural yellow. So fine, I would try laking weld on chalk.
But it would take a while to arrive and mullein was in the garden. I'd already done a lake of mullein. And I was shocked and pleased it was a much brighter yellow than it dyed fabric. So may as well try out the process before the weld arrived.

Laking on chalk is very similar to regular laking: instead of lye or soda ash, you add the chalk mixed in water, but in a slightly higher proportion. Instead of the alum and ash binding with pigment to make a colloidal fluid mass, the alum and pigment bind to the chalk and fall to the bottom...eventually.


WARNING: Do this over a sink. The container must be at least twice as large because the reaction, while not explosive, is vigorous. It foams up to twice its volume, before eventually calming down.


Once the mixture stops being a drama lama, it needs to be washed, much like extracted indigo(link). You cannot depend on filters to make your life easier, unless you have the finest top of the line chemical supplies. Really, once pigmented chalk is poured out to dry, it loses water pretty fast, unlike indigo which takes it's time.

This could work. Then the weld seeds arrived and I was so excited.
Turns out starting weld is bloody fiddly. If I had time and room in the garden, I could experiment. But I know I'm working with a hard deadline. I want to be painting and lettering by the end of summer and the seeds came in early July. They take two weeks to germinate. The prefer partial shade, though the need light to germinate. It's never easy, is it?
First three plants germinated adequately. Then, all but one died from too much sudden sunlight in their pots. The survivor was moved to a north window. It's hanging on gamely, but not large enough I feel safe putting it anywhere outside.
I start another pot. Two more germinate. It's looking good. Then, suddenly, at the end of the day, one just gives up an falls over. Cop on! This is a vigorous weed that grows throughout Eurasia!
There's nothing for it. I have to accept the weld might not come through in time. The survivors are still in pots, now outside on the back ...shaded.. porch. In the meantime I experimented with the other yellow herb on the property: tansy.
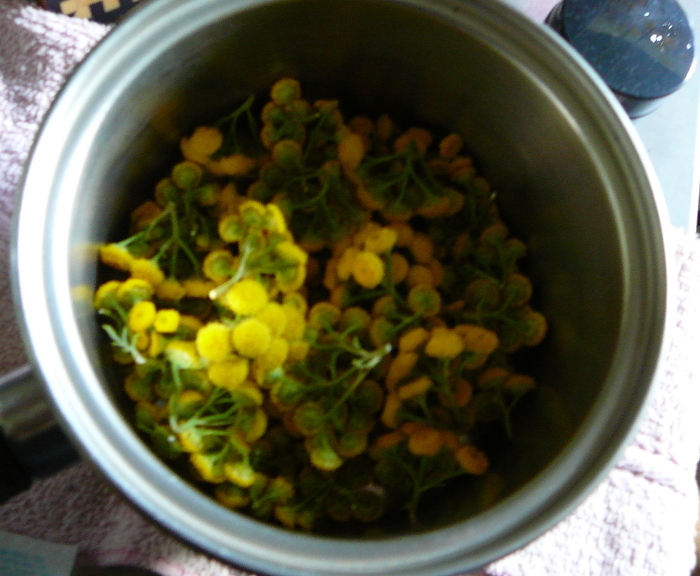
I grow tansy--along with mugwort, vervain, and feverfew... as a digestive bitter. And it's flowers are YELLOW. Oh boy, are they yellow. So trimming only flowers...no leaves need apply....I boiled them per the usual laking method, added alum, then the chalk...and forgot about the vigorous reaction.


It was very amusing. I was able to act fast, save all the mixture by quickly pouring things into larger containers.


Except for that bit of excitement, it was quite a success. Really, the color looks more gold and vibrant.

No idea about colorfastness. But by this time I just reminded myself: they probably kept the gospel book closed most of the time.
I will return to weld if it grows big enough, but I'm also ready to do without it if I must.