Monday, October 12, 2020

Book of Kells: Finished, Submitted

 At long last, it's done.

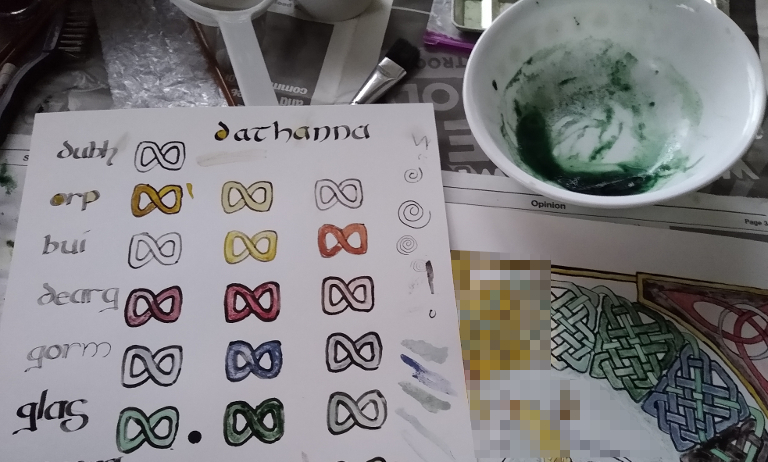
But I cannot publish the finished art because of the rules of the contest. I can publish the  low resolution color test sheet, with all its mistakes and scribbles:


What I learned: those monks are metal. Even limiting myself to natural materials and the morning light, I still had the advantage of central heating and food security.  And modern conveniences.  If poor Brother Cadfael  wanted a hot cup of coffee, he had to wait for the Renaissance.  Tea wasn't much better.  Whatever hot drink...herbal tea, beer, wine...it would have been a hassle to heat it up.  There was no microwave in the scriptorum!  

While I succeeded in creating colors from all natural sources ( to which some pedant will say: "Actually, petroleum is a natural source".  Dun do bheal!), I completely failed at even coming close to a majority of the original pigments.  Historical pigments used:

Gall Ink

Indigo 

And that's it.

Now if I was to expand that to pigments documented to be used in the Middle Ages, we can add:

Iris Green

Zinc

Any lake puts us in the Renaissance.  Sticking to known medieval practices, the best I could say is 4.  But all natural sourced... that is, what a monk or medieval artist could make with the materials and technology of the time.

Here's the color sheet with source pigments labeled:


As for the contest, feicfimid.

.


Thursday, October 8, 2020

Book of Kells Project: Border, Washes and Finishing Touches

After all the main elements were finished, some details required creatively mixing color.   

Orange/Oráiste

This color is conceptually a modern invention.  It isn't that the ancient Irish didn't see orange.  Linguistically they just considered it a type of dark yellow. There's some very interesting documentation about how different languages develop words for colors depending on their lifestyles, the cultural importance of the color and it frequency or rarity.

Even in English the word for "orange" is the same as the non-native fruit, implying in the original Anglo-Saxon we also thought of "orange" as a kind of yellow or gold.  The point being I needed ORANGE for a design element. And so I did it the typical way and mixed  red and yellow, or rather, some madder lake and tansy lake.  


It was a reasonable result, pretty if not authentic.

Around this time I also mixed up the mullien lake, made without chalk.  I wanted a  less opaque yellow for some details.


Pink/Bándearg:

I actually had some pink madder lake I could have ground up.  But the zinc and madder lake were still available and I was tired out with grinding.  So I made a mix with a little water to wash and detail a background.

Grape Hyacinth and Bluebells inks:

I did not freeze these like I did with the Iris Green. That was a mistake.  I did add alcohol, thinking that would be enough to preserve them.  While they did not mold, or otherwise physically degrade, their colors suffered.  The grape hyacinth was no longer purple or even lavender, but a weak yellowish green. Ditto for the Bluebell Ink, that also lost it's magical two tone quality.

Nonetheless, these are colors useful to tint backgrounds. See, as the art was finishing, I was noticing how very BRIGHT the background was compared to the art in the Book of Kells.  This is down to using vellum and the age of the vellum.  Considering the quality of the lighting at the time, the monks would probably have preferred a bright white background if they could get it.  But stylistically, it was too much so I was looking for something to dim it, just slightly.  These inks served well.

There was also mixing and blending for small details, like madder lake and zinc to make a silvery white for the moon.

"Crottle:

This lichen ink was also a useful background wash, mainly for the snakes.  Of all the washes it came the closest to imitating old vellum.  Maybe I should have used it from the beginning.

Book of Kells Project: Donn with Chestnut

 It's a very bad pun.   

"Donn" is Irish for brown and sounds like "down" in some dialects.

Yep.  Ní duine greannmhar mé.  Moving along...

Chestnuts are a staple I forage for in the fall.  I use them in stews, cakes and stuffing.  When boiling them during processing, the liquid was always dark brown.  Surely this could be used for ink or something, right?

Well, yes. Any nut with tannin can be processed with iron salts to produce ink.  Chestnut is less dramatic than oak galls or acorns, but it does work.  The color isn't black, but a warm dark brown.  Which is useful when you need brown.


Chestnut ink was a nice accent.  It also served as a substitution for the lack of any purple from the orchil disaster.  Really would have liked that...

As an aside, dark brown in the manuscript is attributed to iron gall ink.  But I wonder if this just isn't age or a reaction with the vellum substrate?   Because my oak tannin based ink is BLACK.  But I could imagine it might shift tone with age.  


Wednesday, October 7, 2020

Book of Kells Project: Applying Green, Red and Blue

  Glas:


 Months ago I made iris green and, because unlike verdigris, it would go bad, I froze it to use later.  Now it was time to bring it out and let it thaw.

This turned out to be quicker than I thought.  I was worried it might be too thin, but as it thawed, I realized the freezing had done may work for me.  While some water remained frozen, I could pour off the green liquid that had a lovely concentration.  

And it was green now, not dark teal, and certainly not purple.  I had thought I might have to add a couple drops of water with soda ash to shift the color.  But I didn't.  It was green right out of the jar.  And it flowed great.  Not as smooth as the "gall" ink, but pleasant enough.   I applied it with a brush and it went rather quickly.

Iris lake was also used for a darker, forest green.   It would need to be mixed carefully like the other lake pigments.  


In retrospect, I regret not making verdigris.  My concerns about corrosion would have likely been mitigated by the thick paper being used.   Certainly in the short term it would have been safe.  Perhaps next time.

Dearg:


This was the moment madder was made for.  Having figured out how best to mix a smooth pigment, I almost ruined it by rushing the process.  The first madder I applied, the first lake of deep crimson, was grainy.  I just stopped, let the mix sit and did something else for a while.  When I came back, it was perfect. Then I ground and mixed the second lake of red and applied it. Things were coming along.


Gorm:

It couldn't last.   Woad blue was turning out to be my personal nemesis. Try as I might, I could not bring the bright blue of the dye or the deep royal blue of the extracted indigo into a pigment of equal vibrancy on paper.  After some reading, I heard about using indigo flower, the simmering "bloom" on the top of the indigo vat. As it happened, I was making small vats for another art project, so I just brought one in and used a brush to lift the bloom. 


It's not an efficient process.  I started to suspect that if I had mixed freshly extracted, still liquid indigo I would have had better results.  It did make a bluish wash, a tint really, and was better than the earlier blue gray disaster.   But it wasn't blue.   Then I remembered the columbine lake. 


This is what I used for the main patch of blue, painting over the indigo flower.  I left a border untouched so one could compare the effect.  

 In another belated reversal of opinion, I think I should have left the indigo flower.  It was subtle but more natural.  I suppose if the columbine lake completely fades, the indigo will come back into it's own.


Book of Kells Project: Grinding and applying pigment 1

 Earlier in the year, when I'd first extracted indigo pigment and made the first lakes, I was so excited.  All I had to do was grind them, mix them with gum and water, and I would have homemade paints.  Yay! Bhí an-sceitimíní orm...

About that...

The experiment with indigo was less than satisfying but instructive.  

Firstly, indigo doesn't grind down and mix into the lovely blue that one expects from dying.  At best, it makes a navy blue grey.

Secondly, it was grainy.  I thought I wasn't able to grind it finely enough, even though I bought a chemist mortar and pestal for this purpose. That was part of the problem.  But I was to find out the method that worked for me was to grind it as fine as possible, WITH gum arabic, then mix a little water and alcohol, grind it some more, then let it sit for 15 minutes to a half an hour.  THEN grind mix it once more to ensure consistency, adding a little water if needed.

This is not the method used for traditional oil paints.  The pigments used in the Book of Kells are all in the category of water colors: a finely ground pigment, with a binder and water. It's simple, but requires some practice.


Taking the lead from unfinished pages in the manuscript, after inking, I applied the false orpiment.  Both the laked tansy and laked mullein produced workable paint with minimum of fuss.   After testing them both, I decided tansy made a better orpiment substitute.  Regretfully, I was never able to grow enough weld in time to experiment with laking it.  Perhaps next year.

Next, I made some washes with the pale blue lakes, woad and columbine, as a back ground to the center piece.  These were much less satisfying, being grainy and uneven.  This was where I started to let them "soak" a bit.  Fortunately they are pale and give a rough textured effect which, while unwanted, is artistic in it's way. 

The zinc white was extremely easily to work with.  It also doubled as a sort of "white out" if used in very small doses, to cover minor smudges.   It neither has the coverage of real whiteout, nor do any of the pigments have 100% coverage, so one really must plan to be as careful  as  a monk in a scriptorium with nothing else to do.

With the center and "gold" highlights done, I was ready to fill in the rest of the colors.


Friday, October 2, 2020

Book of Kells Project: Inking


 I thought this would take forever.   But it turned out to be the most successful, glorious, satisfying part of the project.

Firstly, the ink came out a lovely black.  Many sources and people I discussed this with were dubious acorns could be a substitute for galls.   Their position, not unreasonable, was the tannins just weren't as concentrated to work.   My position was that just meant I had to boil them down more.  That is the entire reason galls were preferred, their tannins are more concentrated naturally, correct?  

Secondly, in addition to the lovely color, the ink flowed so smoothly you'd think it was manufactured.  I credit this to double straining through muslin before mixing the iron salts with the tannin liquid.   

Thirdly, in my second batch, I hit the perfect proportions of iron salts to tannin.  If it's too far one way, it's grainy; too far the other, it's more of a dark charcoal wash and needs more time to evaporate to the right consistency.  But if it's perfect, just touching the liquid will leave a dark black stain on the skin that will take a day to wash off completely.  That is ink!

Fourthly, it could handle as much detail as the quill nubs allowed.  This was such a relief for the tiny twined lion heads at the corners.  And a single dip really did go far.  If I was writing at a normal size, I could easily scribe lines long enough to finish a couple sentences at a time without pause.

All was not roses however.  There were some missteps.  For some reason I misremembered the styles used in the Book and I "corrected" some of my thin lines, making them much  thicker than I needed or wanted.  Fortunately, I only did that with one element and it looks as if I "meant to do that".  

And I narrowly avoided disaster by unwisely shaking a nub, causing a large drop of ink to fall.  Fortunately this was done on the color test sheet. 

Another annoying issue was my fumbling straight edges.  Those monks must have been kung-fu masters with straight edges.  After the second smear, I just had to stop before I made it worse and accept my "straight" lines would have a wavy appearance.

It took me less than a week to ink the traced design, which was surprising.  But gall/acorn ink  flows nicely.  It's even friendly to my extremely rusty calligraphy skills.  All in all a joy to work with.  I may never buy ink again! 

 Below is the color test sheet.  On it all pigments and inks will be tested before application.  On the right side one can see the spirals tests of various pen nubs.


A final note: all inking and painting was done during the morning, with natural light.